Embryo series courtesy of Einhard Schierenberg
Once you have assigned your mutation to a chromosome, it's time to begin three-point mapping. Three-point mapping is pretty much the backbone of worm genetics and is almost always an obligatory step in the process of cloning our mutants. Even SNP (single-nucleotide polymorphism) mapping (see below) is really just a high-tech variation of classical three-point mapping and is usually preceded by three-point mapping with genetic markers. The basic idea is that we cross our mutation (m) into a strain with two linked morphological markers (a and b) that are on the same chromosome as m, to generate the m/a b heterozygote. We then isolate and follow two classes of recombinant progeny; those that display the A phenotype only (A non-B recombinants) and those that display only the B phenotype only (B non-A recombinants). By seeing which of these two classes produce the mutant phenotype (M) and by scoring the percentages for each, we can determine whether our mutation lies to the left, to the right, or between our set of markers. In the case where the mutation lies in between, we may then determine the approximate distance from each marker.
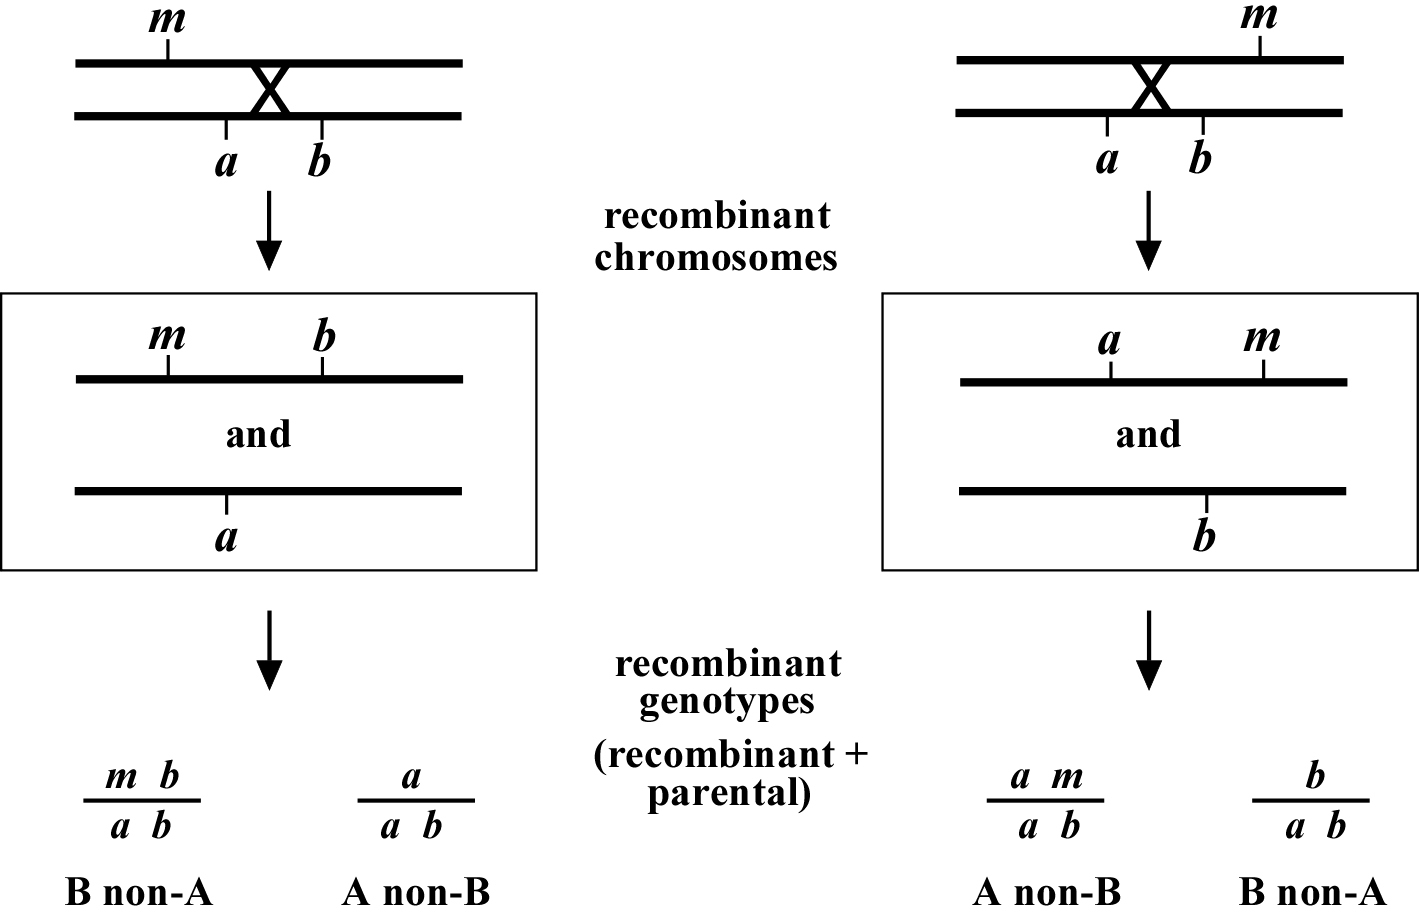
Figure 1 depicts the outcome of a recombination between markers a and b when m lies either to the left or right of the markers. When m lies to the left, essentially all B non-A recombinant animals will throw 1/4B M progeny (as well as B and A B), whereas A non-B recombinant animals will throw only A and A B progeny. When we see this kind of pattern, we can conclude that m lies to the left of a or perhaps to the right of a but very close. The reason for this is that if m were very close to a but between a and b, the frequency of generating the a m recombinant chromosome would be very low (also see below). Thus although m is most likely to the left of a, we often have this caveat. Greater numbers of recombinants can help to diminish this possibility, if not rule it out completely. The situation for m lying to the right is simply the reverse.
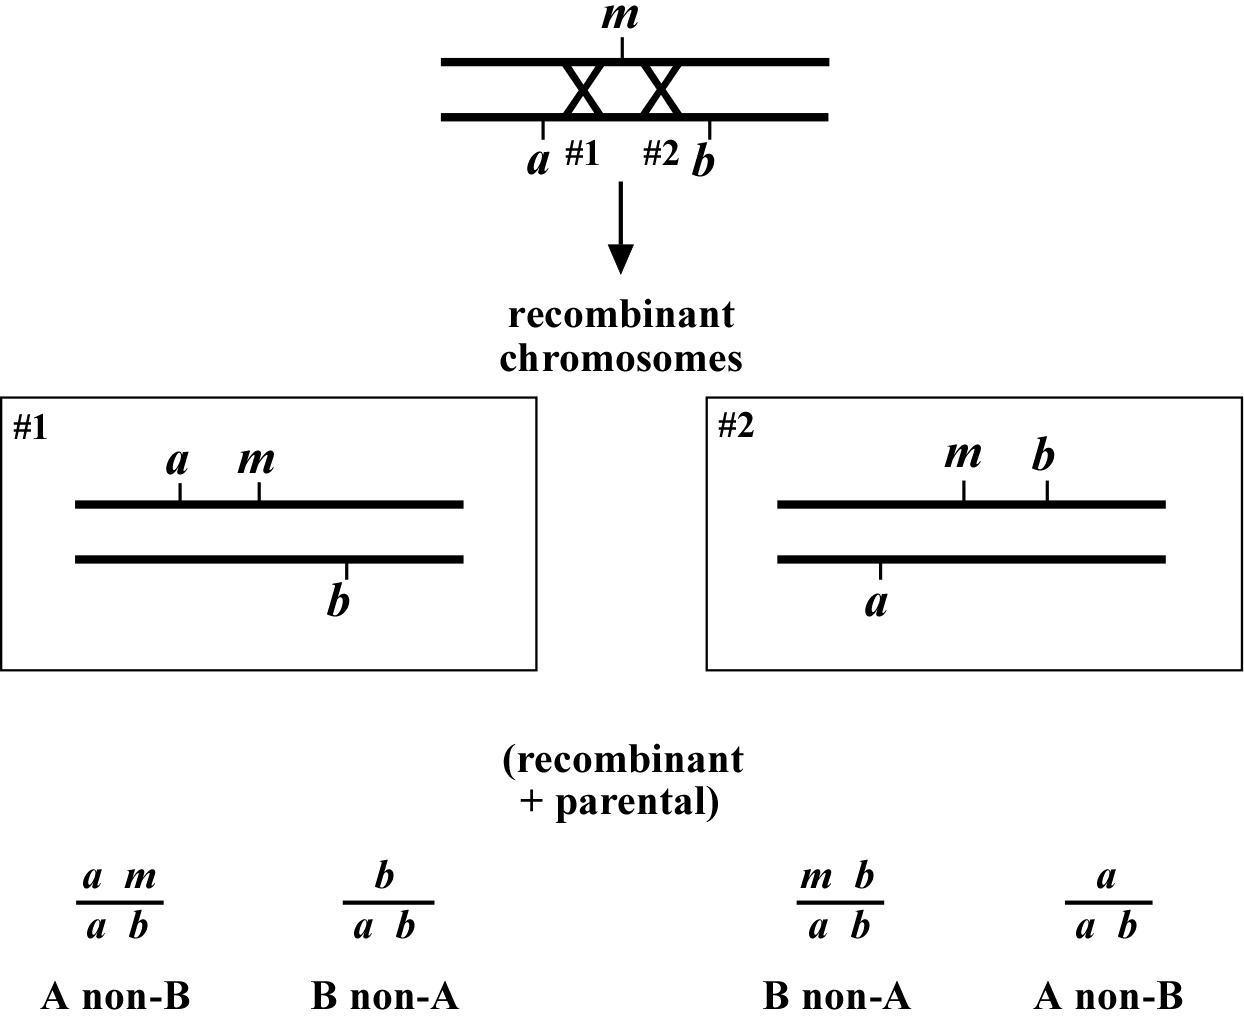
The mapping described above, though useful, only tells us that m is likely to be left or right of our given markers. It doesn't provide any information about how far from these markers m might reside. To determine this we need to use markers that flank m, as shown in Figure 2. Here we see that depending on the site of the cross over,A non-B recombinant animals can in some cases acquire m (#1) and in other cases not (#2). The same is true for B non-A animals. In three-point mapping, we seek to determine the ratio of recombinant animals that pick up the mutation versus those that do not. This ratio provides us with a direct genetic position for the mutation as illustrated in Figure 3.
Here markers a and b are in cis and are located 5.0 map units apart, whereas our mutation, m, is in trans to a and b. In the situation on the left, were we to pick B non-A recombinant animals, four-fifths or 80% would be expected to carry m in cis to b.A non-B recombinants, on the other hand, would acquire m only one-fifth or 20% of the time. On the right, B non-A animals will acquire m only 40% of the time, whereas A non-B animals will acquire it 60% of the time. Obviously, when picking recombinants from both sides, the numbers should converge on a single location, i.e., the frequencies should add up to 100%. These numbers can be used to specifically assign a genetic location. For example, in the left diagram, if a were at genetic position 0.0 on the chromosome and b at 5.0, having 20% of A non-B recombinants acquire m would lead to a map position assignment of 1.0. Obviously, the greater the number of recombinants scored, the greater the certainty of the assignment.
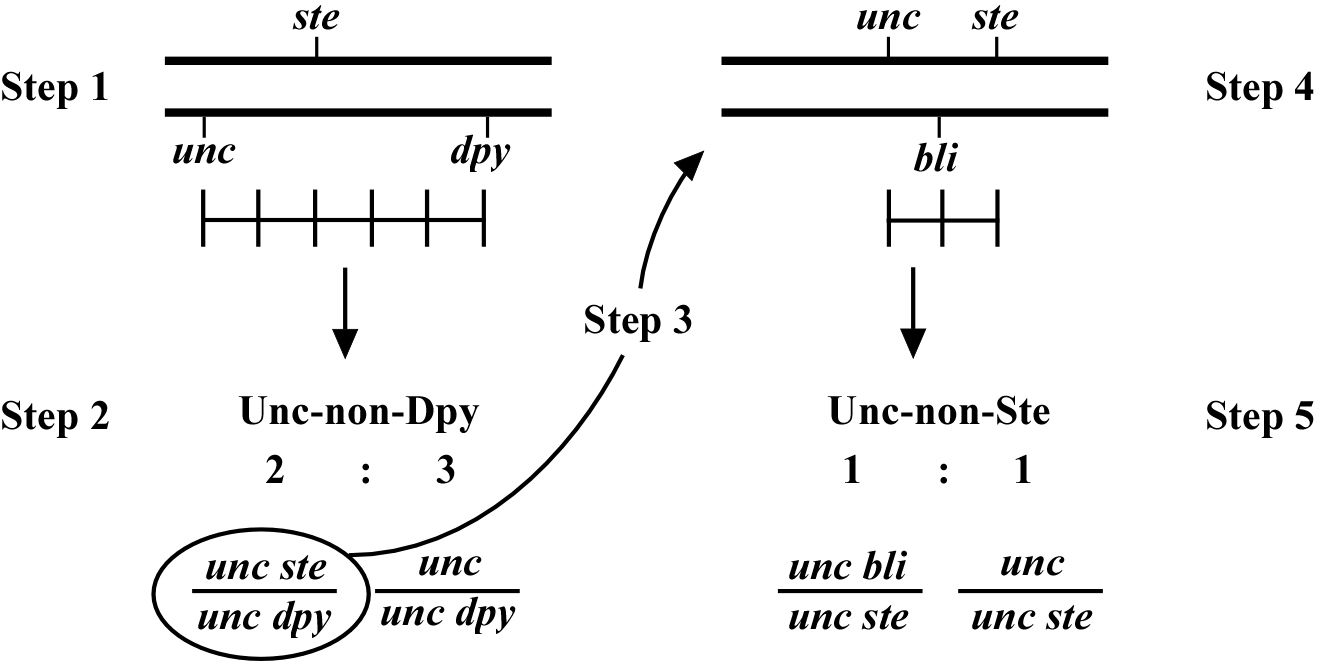
Always save recombinants; they often prove very useful for subsequent mapping, not to mention genetic studies where having a linked marker may prove indispensable. Figure 4 shows an example of how to use the recombinant chromosome for further mapping (also see Mapping with deficiencies and duplications). Imagine we are mapping a ste mutation and have placed it between unc and dpy markers that are separated by 5.0 map units (step 1). The ratios place the ste mutation closer to the unc marker (10 out of 25 Unc non-Dpy recombinant animals threw Unc Ste progeny; step 2). We save theunc ste/unc dpy strain and cross it to a strain that is homozygous for a bli mutation (step 3). We obtain the strain shown in step 4 and then screen for Unc non-Ste animals (step 5). In this case, 50% of the Unc non-Ste recombinants acquired the bli mutation, placing ste and unc mutations at an equal distance (but on opposite sides) from bli.
In this way, we continue to refine the map position of our mutation. Usually the data from different mapping schemes will tend to agree, although not always. This may be due to a number of factors. In general, the farther apart the markers are, the less precise the mapping tends to be. Thus we put more weight on data acquired using nearby markers than those that are at some distance. In addition, it is highly advisable to map using markers that have already been cloned. This provides a precise chromosomal location and allows one to compare directly the genetic and physical maps. If you have no choice but to use a non-cloned mutant for mapping purposes, check Wormbase or journal articles for information regarding how this gene was mapped to its present location.
What happens if you initially map your mutation to the wrong chromosome and then try to carry out three-point mapping? Essentially, your mutation segregates independently of the recombinant chromosome and will be picked up two-thirds of the time. Thus, if for example, 67% of your Dpy non-Unc and Unc non-Dpy animals throw your mutation, you may want to consider revisiting your two-point mapping data.
Another thing to be aware of is the possibility of either multiple crossovers events ordouble recombinants. Multiple crossovers occur when two or more recombination events have taken place on a single chromosome during meiosis. Although such events are purportedly extremely rare, they can happen, and the larger the number of recombinants scored, the greater the possibility that this could be an issue. For this reason, it is generally wise to stick to markers that are approximately 5.0 map units apart when doing three-point mapping. In any case, always be aware of this possibility and refine your interpretations if necessary. Double recombinants simply refer to worms that contain two recombinant (non-parental) chromosomes. These are quite obvious to spot, as they will only throw recombinant progeny. For example, if you pick a Dpy non-Unc and it throws only Dpys (no Dpy Uncs), then both chromosomes must have been recombinant. You will want to toss such strains as they could contain a mixture of dpy and dpy m chromosomes, which would unduly complicate things. As with multiple cross over events, the chance for double recombinants increases as the distance increases between the markers.
At the most basic level, two things should be anticipated in advance of picking recombinants for mapping: 1) the expected frequency of recombinants; and 2) the plate phenotype(s) of the recombinant animals. The first concern is relatively easy to calculate. Because you should know the distance between the two genetic markers, the frequency of recombination events between these markers can be directly determined. For example, if two markers (a and b) are 2.0 map units apart, then a crossover event will occur between a and b in 2% of the chromatid pairs (4% of the tetrads) leading to 1% of the gametes containing an a-only chromosome and 1% containinga b-only chromosome. Because hermaphrodite worms are diploid for all chromosomes, this effectively doubles the chance of acquiring a recombinant chromosome in the progeny, as it can come from either the sperm or the oocyte. To detect the recombinant, however, it must be over the 'correct' parental chromosome (a b), which will occur only 50% of the time. The end result is that if one is looking specifically for A non-B recombinants, and a and b are 2.0 map units apart, then an animal with an A non-B phenotype will occur on average about 1% of the time. Likewise, B non-A animals will occur 1% of the time. Obviously, if the mapping allows picking of either A non-B or B non-A non-recombinants, this will effectively double the total number of recombinant animals that can be obtained from a given number of plates.
The next step is to recognize and pick the recombinant animals. But first it is important before picking from any plate to ask the question: Do the animals on this plate display the expected phenotypes? In effect, you are thereby asking: Did the parental animal have the correct genotype? This is exceedingly important to determine before picking any recombinants. The reason is that recombination events may have occurred in the previous generation such that the cloned parental animal may not have had the correct genotype. For example, you may have picked phenotypically wild-type animals from a plate where the parental animal was of genotype m/a b. Given that self-progeny with the genotype m/a b will be wild type, you might imagine that you are safe in assuming that all wild-type progeny will therefore have genotype m/a b. But imagine the following two scenarios depicted in Figure 5. In the scenario on the left,m lies to one side of the markers a and b. A recombination event between the markers and m can result in the creation of a wild-type chromosome (+) as well as a triple mutant chromosome (not shown). Therefore, when the recombinant + chromosome is paired with one of the parental chromosomes, phenotypically wild-type animals would be generated with the genotype m/+ or +/a b (and not the expected m/a b). Likewise, animals of m/a genotypes (though probably not m/b) could arise following a single recombination event between a and b. For the case on the right, a double recombination event would have to occur to generate a wild-type chromosome, and this will admittedly be very rare. A single recombination event, however, could result in either m/a or m/b animals, which will also appear phenotypically wild type (also see below).
Clearly, one does not want to pick recombinants from plates where the parental animal had the incorrect genotype. This will wreak havoc on one's mapping and lead to incorrect conclusions. The solution is simple: Make sure the phenotypes observed on the plate correspond to the correct parental genotype. For example, if the parental animal has the expected genotype m/a b, then one should see wild-type animals (m/a b), M animals (m/m), and AB animals (a b/a b). In addition, it should be possible to find occasional recombinant animals (A non-B and B non-A), which is exactly what you are looking for. Although simple in practice, fundamental errors by novice mappers are not uncommon. For example, some Dpy mutants may appear partially Unc, thus, loss of the unc mutation could initially go unnoticed. Other markers such as let and egl may require even greater care to maintain. In the end, strict diligence is the only weapon against such mistakes. Bottom line: Do whatever you consider necessary to ensure that recombinants are obtained only from plates with the correct parental genotype.
Recognizing the recombinants that you want may not be trivial! Or it may be, depending on the nature of the mutant phenotypes and your level of experience. For example, you acquire a dpy unc strain for mapping purposes and the double-mutant animals indeed look both Dpy and Unc, but what will the Dpy non-Unc or the Unc non-Dpy recombinant animals actually look like? Often one does not have either the dpy or unc mutation alone for comparison. In the absence of having the single-mutant strains available, the best approach is to read up on the descriptions of the single mutant phenotypes, ask experienced members of your lab for advice, and keep handy the double mutant strain for comparison to any potential recombinants. Once you have isolated a few true recombinants, finding new ones will suddenly get much easier.
How many recombinants should one pick from any given plate? This may depend on several factors. As a rule, be very cautious of plates where you seem to have hit a "gold mine"! ("Wow, I can get all 20 recombinants off of one plate!" NOT.) The simplest explanation when encountering such a plate is that a recombination event must have occurred in the previous generation to affect the parent. This is precisely the situation that was described above. Looking at such plates it will probably be clear that the parent animal did not have the correct genotype. In this case, it is permissible to pick a single recombinant animal, as this does represent one legitimate recombination event. However, even in cases where most animals correspond to the non-recombinant phenotypes (indicating that a parental recombination event did not occur), it is still advisable to pick only 2 or 3 recombinant progeny from any one plate. The (perhaps overly paranoid) worry is that a rare mitotic recombination event could have occurred in the germline to generate a clone of identical recombinant sperm or oocytes.
Often when looking for recombinants to pick, one will examine the same set of plates for several days in a row. It is a common experience that recombinants that are 'invisible' one day will jump out at you the next. Certainly for some types of mutants such as ste or egl, the recombinant phenotype may only be obvious once animals are well into adulthood. When scanning the same set of plates over several days, keep whatever notes necessary to ensure that you don't keep picking your recombinants off the same plate without knowing it. Proper note taking and labeling of plates will prevent this from happening.
What happens if you accidentally pick a non-recombinant animal by mistake? No problem, as it should be quite obvious when looking at progeny in the next generation that a recombinant was not picked. For example, if you attempted to pick a Dpy non-Unc animal and notice several days later that the "recombinant" worm has failed to throw appreciable numbers of Dpy non-Unc animals, or is perhaps throwing phenotypically wild-type animals, obviously the parental animal was not a true recombinant. Chuck the plate and move on. It is better to pick some false recombinants (and eliminate them later) than to miss picking any true recombinants.
A note of caution: Make sure that when picking recombinants, you do not carry over contaminating eggs or larvae! This is surprisingly easy to do and will usually ruin your ability to score that particular recombinant since the plate will be contaminated with animals of non-recombinant phenotypes. If the plate is crowded, move the recombinant animals to a less populated region of the plate in order to clean the recombinant animal of larvae or eggs that may have stuck to its side. Sometimes it may even be necessary to transfer the recombinant to a 'clean-up' plate before cloning to its own plate. As a second line of defense, always watch the recombinant animal after transferring it to its own plate and destroy any contaminating eggs or larvae that may come off. Such procedures become second nature very quickly.
1) The presence of certain phenotypes may prevent that accurate scoring of other phenotypes. For example, the Bli (blister) phenotype is often masked (suppressed) by dpy and rol mutations; unc mutations may mask the Rol phenotype; dpy mutations will usually mask a Lon (long) phenotype; certain dpy and unc mutations may sometimes appear Egl, etc. Obviously, there may be a lot to consider, and going into the mapping well informed is essential. Surprisingly, one can sometimes map with mutations that would seem unlikely. For example, it may be possible to identify certain UncX non-UncY mutants, depending on the nature of the two Unc phenotypes.
2) It is highly recommended that you render your phenotypic judgments on animals that have been propagated on clean plates containing sufficient OP50. Many bacterial contaminants can actually prevent the accurate scoring of Unc and Ste phenotypes in genetic crosses. In addition, starved plates can lead to erroneous conclusions regarding sterility, brood sizes, Egl, and other phenotypes. If in doubt, you can always bleach your strains and reassess phenotypes later from clean plates. Better yet, make sure that your plates and strains are clean before initiating the mapping process.
3) Clearly, the most efficient type of three-point mapping would allow for picking of recombinants from "both" directions. For example, one can pick Unc non-Dpy and Dpy non-Unc recombinant animals from a strain with a dpy unc chromosome. The benefit of this setup is that it effectively doubles the number of recombinants obtained from a given number of plates, and provides independent mapping information from both types of recombinants (which will hopefully correspond!). It is not uncommon, however, that the markers will dictate that only one of two possible recombinants is picked. For example, when looking for recombinants between unc and let (lethal) mutations, it will only be possible to identify and pick Unc non-Lets for obvious reasons. The same thing occurs when using markers that confer a sterile phenotype, in situations where one of the markers masks the phenotype of the other (e.g., Rol non-Uncs versus Unc non-Rols), or where penetrance is an issue (see above).
4) Finally, as with all genetics, it is wise to pick more worms than is anticipated to be necessary. The rate-limiting step for all genetics is growth of the animals, and not the time required to transfer a few more worms to plates. Still, there is a limit to how much information can be gleaned from any one cross, and good researchers are always efficient in the use of their time.
When is one done with three-point mapping? Before the advent of SNP mapping, the common strategy was to play out all of one's cards. Namely, you would use every available genetic marker or chromosomal rearrangement to minimize the size of the genetic region known (or likely) to contain your mutation. Once this was done, cosmid injections to obtain rescue could begin. Of course, the paucity of markers in many regions often meant that many cosmids would have to be injected (not a trivial task). Even worse, for many regions, complete cosmid coverage was (and is still) very incomplete. As described in SNPs: introduction and two-point mapping, all this has changed with the advent of SNP mapping, and although a reasonable amount of standard three-point mapping is still done, it is not done so exhaustively. Thus to answer the initial query - one usually ceases three-point mapping when the mutation has been placed within a 1- to 5-map unit region that is bounded by two solid genetic markers which correspond to known locations the physical map (i.e., the markers have been cloned). Having said that, if the region is rich with genetic markers, there is no particular reason to stop genetic mapping all together. In some circumstances, it may still be the most efficient means by which to narrow down the region of interest to a workable size for injections or candidate cloning.
Regardless of the stage at which you conclude your genetic mapping, you will still want to use your data to find ground zero on the physical map; that is, the stretch of DNA where your mutation is predicted to reside. One simple way to do this is to construct a complete graphic of the physical map for the region, a process that may require some actual cutting and pasting of a printout of the map. One then takes actual physical measurements of the distances between the markers used (e.g., 135 mm) and, based on the obtained mapping data, finds the point on the chromosome that has been implicated. Note: When generating this map, do not use AceDB, as this program does not currently draw to scale regions containing cosmid gaps. The SNPs database currently provides an excellent graphic for this purpose, and as you will likely be completing your mapping using SNPs, you will want to construct this anyway. Alternatively, one can avoid the graphic map entirely by calculating the predicted site of the mutation based on the numerical chromosomal locations of the markers used (e.g., 9,279,450). This is quite straightforward and eliminates potential errors associated with any graphic representation. Detailed information for this purpose can be found on Wormbase.
It should be pointed out that while it may be satisfying to point to a single base pair on the chromosome as being the most likely site of one's mutation, this prediction is only as good as the mapping data. Furthermore, regional variations in recombination frequency along the chromosome will lead to significant discrepancies between the actual locations of genes and those predicted using these methods. Still, this will allow you to predict better which SNPs might be most appropriate for testing first, or if the region is small enough, to compile a list of likely rescuing cosmids and prioritize your order of injections.
*Edited by Victor Ambros. Last revised May 3, 2005. Published February 17, 2006. This chapter should be cited as: Fay, D. Genetic mapping and manipulation: Chapter 3-Three-point mapping with genetic markers (February 17, 2006), WormBook, ed. The C. elegans Research Community, WormBook, doi/10.1895/wormbook.1.92.1, http://www.wormbook.org.
Copyright: © 2006 David Fay. This is an open-access article distributed under the terms of the Creative Commons Attribution License, which permits unrestricted use, distribution, and reproduction in any medium, provided the original author and source are credited.
§To whom correspondence should be addressed. E-mail: davidfay@uwyo.edu
 All WormBook content, except where otherwise noted, is licensed under a Creative Commons Attribution License.